
TECHNOLOGY
Uses for a 300AAC Muzzle Brake: What You Need to Know
Uses for a 300AAC Muzzle Brake: What You Need to Know
The 300AAC Blackout (300AAC) cartridge has rapidly become a favorite among shooting enthusiasts, military, and law enforcement personnel for its versatility, effectiveness, and compatibility with the AR-15 platform. However, like any high-performance rifle, controlling recoil and muzzle rise is essential to maintain accuracy and improve shooting performance. One of the most effective tools for managing these factors is the muzzle brake.
A 300AAC muzzle brake serves as an attachment that reduces the recoil and muzzle rise that naturally occur when firing a weapon. It achieves this by redirecting the gases produced when a round is discharged. This allows the shooter to maintain better control over their firearm, resulting in improved accuracy and quicker follow-up shots. This article will explore how a 300AAC muzzle brake works, where you can use it, and how it enhances your shooting experience.
Introduction to Muzzle Brakes and Their Function
A muzzle brake is a device attached to the muzzle of a firearm, designed to reduce the amount of recoil and muzzle rise experienced by the shooter. It works by redirecting the gases generated when the gun is fired, which in turn minimizes the backward push of the gun and reduces the upward motion of the muzzle. By doing so, a muzzle brake allows for more accurate shooting, particularly in rapid-fire scenarios, by keeping the sights or reticle on target after each shot.
Muzzle brakes are essential for high-caliber firearms like the 300AAC, where recoil can be significant. For those shooting at longer ranges or requiring quick follow-up shots, a muzzle brake is a valuable tool for improving shooting precision and performance.
What is a 300AAC Muzzle Brake?
Understanding the 300AAC Cartridge
The 300AAC Blackout is a popular cartridge known for its versatility and capability in various shooting applications. It is chambered in AR-15 rifles, making it a convenient option for shooters who want a powerful round without sacrificing magazine capacity. The 300AAC can be used in both supersonic and subsonic configurations, providing a range of options for different types of shooting needs.
The 300AAC’s effectiveness in close-range tactical and home defense situations, as well as its suitability for hunting, makes it a top choice for many shooters. However, managing its recoil can be a challenge, especially when firing heavier rounds at high speeds. This is where a muzzle brake comes in.
Features of a 300AAC Muzzle Brake
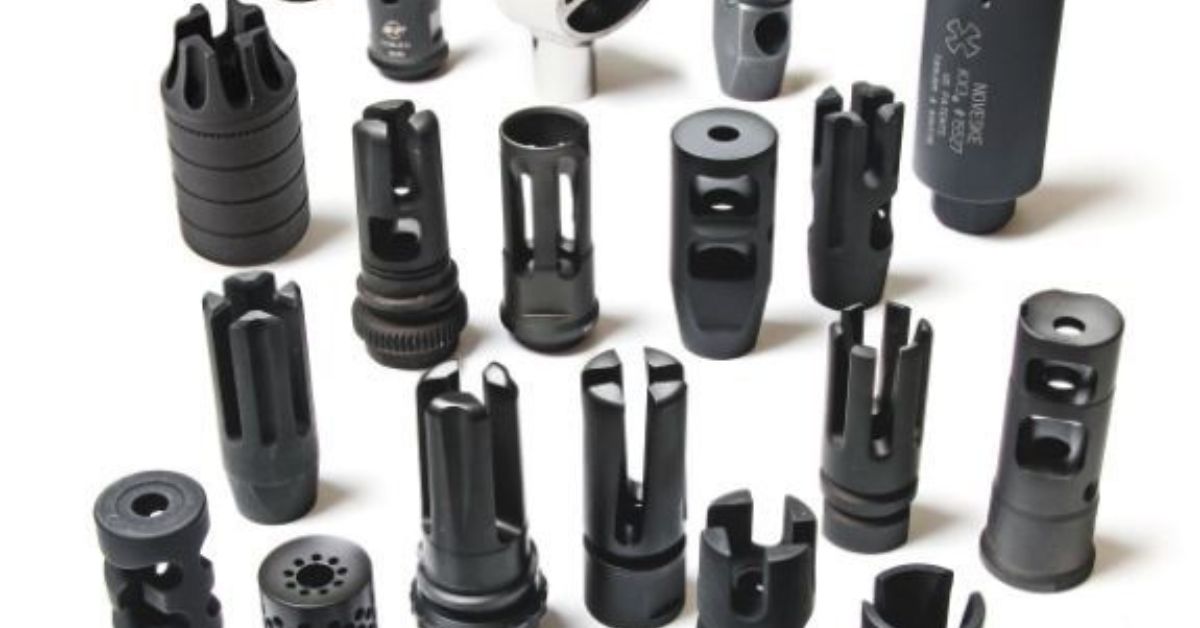
A 300AAC muzzle brake is designed specifically for rifles chambered in the 300AAC Blackout cartridge. These muzzle brakes come in various designs, with features aimed at improving performance. The main function of a muzzle brake is to redirect the gases produced when firing a shot to reduce recoil and muzzle rise.
Muzzle brakes for the 300AAC typically feature:
- Ported design: Gases are directed outward, helping control recoil.
- Durable construction: Made from high-strength materials like stainless steel or titanium for long-lasting performance.
- Thread compatibility: Designed to fit the thread pattern of the 300AAC barrel, typically 5/8-24 threads or 1/2-28 threads.
How Does a Muzzle Brake Improve Shooting Performance?
Reducing Recoil
Recoil is the backward force experienced when firing a shot, and it can significantly affect a shooter’s ability to maintain control over the firearm. The 300AAC cartridge, while less intense than larger rounds like the .308, can still produce substantial recoil. A muzzle brake reduces this recoil by redirecting the gas propelling the bullet down the barrel.
By reducing recoil, a muzzle brake ensures that the shooter can maintain better control of the rifle, enabling them to stay on target even after firing. This is particularly important in situations where rapid follow-up shots are needed, such as tactical operations or competitive shooting.
Managing Muzzle Rise
Muzzle rise is the upward movement of the firearm when it’s fired. This phenomenon can make it difficult to keep the sights or reticle on target, especially when shooting quickly. A 300AAC muzzle brake helps counteract this effect by redirecting gases to push the firearm downward, preventing the muzzle from rising excessively after firing.
With reduced muzzle rise, shooters can regain their sight picture quickly, allowing for faster follow-up shots and improved shooting performance.
Common Firearms Compatible with 300AAC Muzzle Brakes
AR-15 Style Rifles Chambered in 300AAC
The AR-15 platform is the most common rifle type chambered in 300AAC. This firearm offers the versatility of being lightweight, customizable, and powerful. Adding a muzzle brake to a 300AAC AR-15 helps reduce recoil, making the rifle easier to control, especially when firing multiple shots quickly. This is highly beneficial in tactical and competitive environments, where fast follow-up shots are crucial.
Bolt-Action Rifles
Bolt-action rifles chambered in 300AAC also benefit from muzzle brakes. The recoil from bolt-action rifles can be more pronounced, as they are typically heavier and more powerful than semi-automatic rifles. Installing a muzzle brake on a bolt-action 300AAC rifle helps make the shooting experience more comfortable by reducing recoil and muzzle rise, enabling shooters to maintain their focus on the target.
Short-Barreled Rifles (SBRs)
Short-barreled rifles (SBRs) chambered in 300AAC are popular for tactical operations due to their compact size. However, shorter barrels often result in increased recoil and muzzle rise. A 300AAC muzzle brake installed on an SBR helps mitigate these issues by reducing recoil and controlling muzzle rise, making the rifle more manageable in high-pressure situations.
Benefits of Installing a 300AAC Muzzle Brake
Enhanced Accuracy
One of the primary benefits of installing a muzzle brake on a 300AAC rifle is improved accuracy. By reducing recoil and muzzle rise, a muzzle brake enables the shooter to stay on target during rapid-fire sequences. This is essential for both tactical and competitive shooting, where accuracy is critical for success.
Faster Follow-Up Shots
When shooting rapidly, a muzzle brake helps the shooter quickly regain control of the rifle and get back on target for follow-up shots. This is especially useful in tactical situations where multiple shots are required in quick succession or in hunting scenarios that demand a fast second shot on target.
Reduced Shooter Fatigue
Shooting a high-recoil rifle repeatedly can cause fatigue over time. By reducing the amount of recoil experienced with each shot, a muzzle brake helps minimize shooter fatigue. This allows for longer shooting sessions with greater comfort and focus.
Choosing the Right 300AAC Muzzle Brake
Closed-Tine vs. Open-Tine Muzzle Brakes
Muzzle brakes come in different designs. Closed-tine muzzle brakes are designed with fewer ports, which redirect gases in a controlled manner. These are ideal for situations where noise and dust disturbance are a concern. On the other hand, open-tine muzzle brakes have more exposed ports, which provide greater recoil reduction but may generate more noise.
Thread Compatibility
When choosing a muzzle brake for your 300AAC rifle, ensure that it matches the thread pattern of your rifle’s barrel. The two most common thread patterns for 300AAC are 5/8-24 and 1/2-28, so be sure to check your firearm’s specifications.
Considerations for Your Shooting Needs
Different muzzle brakes are suited for various shooting environments. If you’re engaging in precision shooting, a muzzle brake that offers minimal disruption of the shooter’s surroundings may be ideal. If you’re in a tactical or competitive setting, a brake that provides maximum recoil reduction might be more beneficial.

Pests have always been a problem, but in recent years, rising global temperatures, increased travel, and urban density have made insect infestations more common and harder to control. Traditional chemical sprays often bring more harm than good, leading people to look for environmentally safe repellents that won’t damage ecosystems.Insetprag represents this shift. It’s not just about exterminating pests; it’s about balancing prevention, removal, and sustainable solutions.
Imagine living in Prague during summer: mosquitoes thrive near the Vltava River, ants sneak into cafes, and bed bugs occasionally spread through hotels. For locals and tourists alike, reliable Prague pest control services are a necessity. Insetprag aims to provide comprehensive, eco-conscious, and technologically advanced options.
The Evolution of Insect Control Solutions
From Chemicals to Eco Pest Management
In the past, chemical pesticides dominated the pest control industry. While they were effective, they left behind toxic residues that harmed soil, water, and non-target species. Today, eco pest management is leading the way.
Biological controls: Using natural predators like ladybugs to combat aphids.
Essential oil sprays: Safer, plant-based alternatives for household use.
Integrated Pest Management (IPM): Combining prevention, monitoring, and targeted treatment.
The benefit? Long-term effectiveness without the collateral damage.
Insect Repellent Devices That Work Smarter
One of the biggest shifts in 2025 has been the rise of insect repellent devices powered by AI and IoT. These gadgets not only repel insects but also collect data on pest activity.
Some of the most popular innovations include:
Ultrasonic repellents that use sound waves to deter pests.
Smart bug zappers with energy-efficient LED lights.
Wearable repellents, perfect for outdoor activities.
These devices reduce the need for harmful sprays while providing continuous household insect protection.
Prague Pest Control Services: Local Expertise Meets Innovation
If you live in Prague, you’ve likely noticed an increase in professional pest control services offering modernized packages. Traditional exterminators now combine insect removal services with smart monitoring systems.
For instance:
A family in Prague 7 installed a smart pest control system that automatically detects bed bugs in furniture.
Restaurants in Old Town are using bug trap technology that integrates with mobile apps to alert managers about cockroach activity before it becomes a full infestation.
This integration of traditional expertise with modern technology makes Prague a leader in urban pest management.
The Science Behind Insect Prevention Methods
Prevention has always been better than cure. But in 2025, insect prevention methods have become more advanced, combining design, materials, and data-driven insights.
Smart window screens that release micro-doses of repellents.
Soil-based solutions that discourage ants from nesting near homes.
Moisture control systems that reduce environments where mosquitoes breed.
By adopting these methods, homeowners can drastically reduce their dependence on chemical sprays.
Bug Trap Technology: A Closer Look
Bug trap technology has gone beyond sticky boards and flypaper. In 2025, traps are smarter, more targeted, and environmentally conscious.
Pheromone traps attract specific insects like moths or beetles.
AI-powered traps analyze captured insects to provide prevention tips.
Solar-powered traps offer a sustainable solution for outdoor use.
One user recently tweeted: “Never thought I’d geek out over a bug trap, but my smart insect catcher just pinged me with data about mosquito activity in my backyard. This is the future!”
Smart Pest Control Systems: Automation at Its Best
Smart homes are no longer just about lighting and thermostats—they now include smart pest control systems. These systems integrate with home assistants like Alexa or Google Home to provide updates on insect activity.
Automatic scheduling of repellents.
Real-time alerts about unusual pest behavior.
AI-driven recommendations for prevention.
This level of automation brings peace of mind, especially for households with children and pets.
Household Insect Protection in Everyday Life
Let’s talk practicality. What does household insect protection actually look like for a typical family?
Kitchen hygiene: Smart bins that seal automatically to prevent flies.
Bedroom defense: Anti-mosquito smart screens and essential oil diffusers.
Garden care: Eco-friendly sprays that don’t harm pollinators.
With these steps, homes remain comfortable without sacrificing safety or sustainability.
The Rise of Insect Removal Services
While prevention is ideal, infestations still happen. That’s where professional insect removal services step in. In 2025, these services are more customer-friendly, data-driven, and eco-conscious.
On-demand apps allow you to book pest control within hours.
Services guarantee environmentally safe repellents instead of harsh chemicals.
Real-time tracking shows when and where technicians treated your property.
This makes pest control less intimidating and far more transparent.
Balancing Innovation with Environmentally Safe Repellents
Perhaps the biggest challenge in pest management has always been safety. Harsh pesticides can kill pests, but they often harm beneficial insects like bees. That’s why environmentally safe repellents are at the heart of modern solutions.
Examples include:
Neem oil sprays.
Citronella candles.
Non-toxic gels for cockroaches.
These options strike the balance between effectiveness and ecological responsibility.
Real-Life Example: Insetprag in Action
In insetprag, a café owner faced recurring issues with fruit flies near their bar. Instead of relying on chemical sprays, they installed a smart bug trap technology system combined with eco pest management techniques like regular waste monitoring and herbal repellents. Within two weeks, the fly population dropped by 80%, without any disruption to customers.
The owner said: “It was a relief to find something that worked without risking my staff’s health or the taste of our cocktails.”
Pros and Cons of Modern Pest Control
Pros
Eco-friendly and safe for children/pets.
Data-driven and preventive.
More affordable in the long run.
Cons
Higher upfront costs for smart devices.
Some eco repellents need frequent reapplication.
Dependence on apps may feel overwhelming for older users.
FAQ’s
How effective are eco pest management solutions compared to chemical sprays?
Eco pest management is just as effective in the long term because it focuses on prevention, monitoring, and targeted solutions. While chemical sprays may give quick results, eco methods prevent re-infestation and avoid harmful side effects.
Can smart pest control systems replace traditional insect removal services?
Not entirely. Smart systems are excellent for prevention and monitoring, but when infestations get severe, professional insect removal services are still necessary.
Are insect repellent devices safe for kids and pets?
Yes, most modern insect repellent devices are designed with safety in mind, using ultrasonic waves or natural repellents instead of toxic chemicals.
What’s the best insetprag prevention method for city apartments?
For urban living, Prague pest control services recommend sealing entry points, installing smart screens, and using eco-friendly indoor repellents.
Conclusion
Insetprag isn’t just a product—it’s a movement toward smarter, safer, and more sustainable pest management. With innovations in bug trap technology, smart pest control systems, and environmentally safe repellents, we’re entering a new era of household and commercial protection.

Understanding the Besten company profile helps explain why the brand is growing in visibility. Founded with a mission to provide affordable yet high-quality equipment, Besten machines focuses on both industrial-scale projects and consumer-level needs.
In recent years, the company has expanded its portfolio from construction tools to cleaning equipment and industrial machines. Customers often highlight the balance between durability and cost-effectiveness, making it a popular choice in competitive markets.
A contractor once put it this way: “Besten machines don’t always have the fanciest designs, but they work hard, last long, and don’t break the bank.”
Besten Machine Reviews: What Customers Are Saying
Common Strengths Reported
- Durability: Many users find that Besten equipment holds up well in heavy use.
- Affordability: Positioned between budget and premium brands, giving good value.
- Ease of Use: Most models are designed with straightforward functionality.
Reported Limitations
- Limited spare parts in certain regions.
- Customer support response times vary.
- Design may feel basic compared to premium competitors.
Overall, Besten machine reviews suggest a solid mid-tier brand with practical reliability.
Besten Equipment Categories
Besten Industrial Machines
The Besten has steadily gained traction with industrial machines for factories and large-scale operations. These include cutting, welding, and heavy-duty handling tools. Users report they’re best suited for medium-sized businesses that need quality without premium prices.
Besten Construction Tools
For contractors and builders, Besten construction tools have become an accessible choice. From power drills to portable mixers, the emphasis is on sturdy build and consistent output. They may not rival high-end global brands, but for regional projects, they’re considered reliable workhorses.
Besten Cleaning Machines
This is where the brand has made waves recently. Besten cleaning machines—vacuum systems, floor polishers, and pressure washers—are widely adopted by small cleaning businesses. The balance of price and efficiency makes them especially appealing for startups.
Popular Besten Products in 2025
Here’s a quick look at Besten products users mention most often:
| Product Type | Popular Model | Ideal For | Price Range (USD) |
|---|---|---|---|
| Industrial Machine | B-IND3000 | Medium factories | $1,200–$2,000 |
| Construction Tool | B-CON1500 | Contractors/Builders | $400–$800 |
| Cleaning Machine | B-CL1000 | Small cleaning businesses | $250–$500 |
| Consumer Tool | B-HOME500 | DIY/Home use | $120–$250 |
Besten Machine Dealers: Where to Buy Safely
One challenge buyers face is finding trusted Besten machine dealers. Since counterfeit equipment occasionally surfaces in certain markets, it’s important to:
Buy from authorized dealers listed on the official company site.
Ask for warranty certificates at purchase.
Check whether the dealer stocks Besten spare parts for future needs.
Besten Machine Warranty and After-Sales Support
A Besten machine warranty typically covers:
- 12–24 months on parts and labor.
- Extended warranty options for industrial equipment.
- Limited coverage for wear-and-tear items.
Customers report that while warranty policies are fair, support responsiveness can vary by region. That’s why purchasing through recognized Besten dealers makes a difference.
Availability of Besten Spare Parts
Maintenance is key to extending machine life. Besten spare parts availability is decent in urban markets but can be harder to source in remote regions. Many buyers recommend ordering original parts directly through authorized dealers to avoid counterfeit risks.
Why Choose Besten Machines Over Competitors?
- Affordability: Positioned as mid-range, offering quality without premium pricing.
- Product Range: From industrial machines to cleaning tools, covering multiple industries.
- Ease of Use: Less complexity compared to premium brands, great for new businesses.
- Warranty Coverage: Reasonable support for the price point.
But: If you need ultra-advanced features or cutting-edge designs, you might prefer higher-end brands.
Real-Life Example: A Small Business Perspective
A cleaning service startup in Southeast Asia shared: “We started with just two Besten cleaning machines. They were affordable, easy to maintain, and reliable for daily jobs. As our business grew, we scaled with more advanced equipment, but Besten gave us the foundation to get started.”
This story highlights how Besten machines help new businesses grow without massive upfront investment.
Comparing Besten to Other Brands
| Feature | Besten Machines | Premium Global Brands | Low-Cost Brands |
|---|---|---|---|
| Price Range | Mid-range | High | Budget |
| Durability | Good | Excellent | Variable |
| Features/Tech | Standard | Advanced | Basic |
| Spare Parts Availability | Moderate | Wide | Limited |
| Best For | Small/Medium business | Enterprises | DIY/Short-term |
Risks and Considerations
- Counterfeit Products: Only buy from official dealers.
- Warranty Coverage: Varies regionally, always confirm before purchase.
- Spare Parts: Can be an issue in less developed markets.
The Future of Besten Equipment in 2025 and Beyond
With global demand for cost-effective industrial and cleaning equipment, Besten is expected to expand into smart machinery integration. AI-driven diagnostics and IoT-enabled monitoring may soon feature in new product lines, making the machines smarter and easier to maintain.
FAQ’s
Are Besten machines reliable for industrial use?
Yes, Besten industrial machines are considered reliable for medium-scale industries, though not as feature-rich as premium global brands.
Where can I buy authentic Besten equipment?
Always purchase from authorized Besten dealers to ensure warranty support and genuine spare parts availability.
Do Besten cleaning machines work for commercial businesses?
Yes, they’re popular with small cleaning companies thanks to their affordability and ease of use.
How does the Besten warranty compare to others?
It’s competitive in the mid-range segment, covering most parts for 1–2 years, though coverage can vary by region.
Conclusion
If you’re looking for reliable, mid-range equipment that balances cost and durability, Besten machines are worth considering. They’re especially ideal for small to medium businesses in construction, cleaning, or light industrial sectors.

Introduction to IT Managed Services
Minimizing downtime is crucial for maintaining business continuity and efficiency in the digital landscape. Many businesses today turn to IT managed service providers and beyond to keep their systems running smoothly. These services allow companies to delegate the maintenance of IT infrastructure to specialists, freeing up resources to focus on core operations. This shift not only alleviates the burden of dealing with unexpected technical issues but also ensures that businesses can leverage the latest technological advancements without the heavy lifting often required by in-house teams.
The Impact of Downtime on Business Efficiency
Downtime has a tangible impact on productivity and can severely damage a company’s reputation. A Gartner study indicated that the average cost of IT downtime is $5,600 per minute. This underscores the need for robust IT solutions to minimize disruptions and maximize business output. When systems are down, employee resources are underutilized, and customer satisfaction can plummet. In sectors like finance or healthcare, where data accessibility and reliability are paramount, even a momentary lapse can lead to substantial losses, both financially and in terms of customer trust. In urban centers with dense business activity, such as Toronto, many organizations turn to IT managed service providers Toronto relies on to implement preventive strategies and maintain operational continuity. These providers are often sought for their proximity and understanding of local infrastructure challenges. However, the decision to partner with a provider should still be based on thorough evaluation, including service scope, response times, and alignment with organizational needs.
How IT Managed Services Minimize Downtime
Managed IT services proactively monitor and manage networks to prevent downtime. By regularly updating systems and troubleshooting potential issues, these services minimize disruptions. Continuous monitoring allows for early detection of anomalies, ensuring swift corrective actions that keep businesses operational. With real-time monitoring, managed services can address minor issues before they escalate into major problems. This proactive stance preserves business resources and enhances operational resilience, providing a more stable environment for employees and clients.
Proactive vs. Reactive IT Support
Proactive IT support focuses on anticipating and preventing issues before they occur rather than addressing them after they arise. This approach significantly reduces the frequency and severity of downtime incidents, saving businesses time and money in the long run. Unlike reactive support, which often results in scrambling to fix issues after they’ve caused a significant impact, proactive support implements solutions to potential problems before they disrupt business operations. It involves a strategic approach, including regular system audits, predictive maintenance, and consistent performance monitoring.
Cost Benefits of Outsourcing IT Services
Outsourcing IT needs can be financially advantageous. Unlike maintaining a full-time, in-house IT department, engaging managed services curtails overhead expenses. A report from Computerworld highlights how outsourcing enables access to a broad pool of IT expertise at a fraction of the cost. By outsourcing, companies can convert fixed IT expenses into variable costs, improving flexibility and budgeting. Additionally, outsourcing offers scalability options that can benefit businesses experiencing rapid growth or restructuring.
The Future of IT Managed Services in Business
Technological advancements are poised to accelerate the evolution of IT managed services. Artificial intelligence and machine learning are paving the way for more precise predictive analytics, which enhance the ability to foresee and address technical issues before they affect business processes. Integrating these technologies into IT services allows for automatic system updates, security enhancements, and a more strategic allocation of IT resources. As these tools evolve, businesses can expect even more sophisticated service offerings that support innovation, drive efficiency, and mitigate risks.
How to Choose the Right IT Managed Service Provider
Selecting the right managed service provider involves examining their industry experience and resource availability. Reviewing case studies and client testimonials can provide insights into their effectiveness. Businesses should seek providers that align with their strategic goals to ensure a fruitful partnership. It’s important to consider the provider’s approach to customer service, their ability to tailor solutions to your needs, and their track record in handling similar business environments. This careful vetting process ensures that companies find a partner capable of delivering lasting value and sustainable business growth.
-

 GENERAL8 months ago
Classroom6x: Revolutionizing the Future of Learning
-

 ENTERTAINMENT8 months ago
Unveiling the Mystery of Kashito_Toto: A Digital Frontier
-

 TECHNOLOGY8 months ago
Unlocking the Power of SSIS 816: A New Era in Data Integration
-

 TECHNOLOGY8 months ago
Unlocking the Mystery of Vy6ys: A Hidden Gem
-

 GENERAL8 months ago
Unraveling Time: What Hour Was It 8 Hours Ago?
-

 GENERAL8 months ago
Quid Pro Quo Harassment: What It Is and Why It Matters
-

 BUSNIESS8 months ago
What Does ‘In Transit’ Mean? Understanding Shipment Status
-

 GENERAL8 months ago
What does reshmina like