
How to add new IP address and change main shared IP address on cPanel
How to Add a New IP Address / IP range on a cPanel/WHM server
Before changing the shared IP address you must add a new IP address on your server. You can skip this section if you already have a a free IP address on your server. It is possible to add additional IP address through WHM without making any changes in the backend file. Before adding the IP address you must contact the hosting provider/datacenter and get the details of the IP address they have assigned to your dedicated/VPS server. Follow the below steps to add a new IP address on cPanel/WHM server.
1. Open a new web browser and type the below URL to access Webhost Manager (WHM)
URL to access WHM :
http://YourServerIP:2086
OR
http://YourHostname:2086
2. Search for “Add a New IP Address” in WHM search bar like shown in the below picture
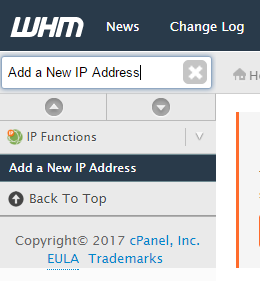
3. Click on “Add a New IP Address” under “IP Functions”
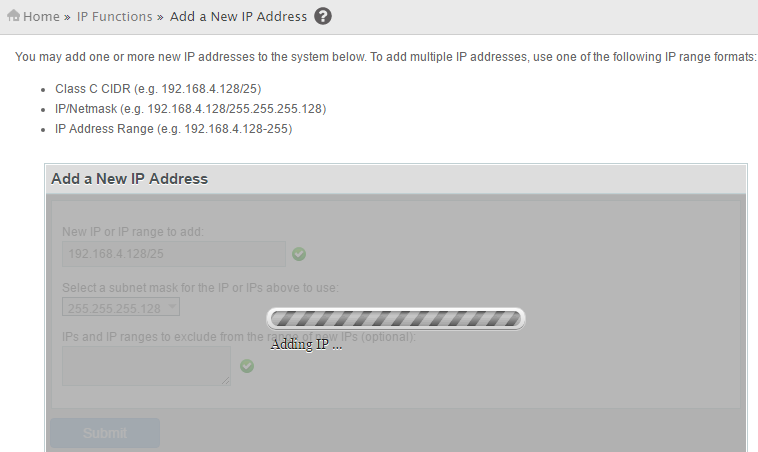
Home » IP Functions » Add a New IP Address
4. Enter IP and subnet mask
In “New IP or IP range to add” field you must enter the IP address/Range of IP address that you want to add.
“Select a subnet mask for the IP or IPs above to use” : Select the subnet mask from the dropdown
IPs and IP ranges to exclude from the range of new IPs (optional): You can exclude few IP address from the range of IPs that you’re adding.
To add multiple IP addresses, use one of the following IP range formats:
Class C CIDR (e.g. 192.168.4.128/25)
IP/Netmask (e.g. 192.168.4.128/255.255.255.128)
IP Address Range (e.g. 192.168.4.128-255)

5. Click on “Submit” after entering the above details
Go to “Show IP Address Usage” under “IP Functions” to see all the IP address that you have added.
WHM Home » IP Functions » Show IP Address Usage
Now we have added a new IP address on the server. Do the below steps to change the shared IP address of the server to new IP address we have added.
How to Change Main Shared IP address of a cPanel/WHM Server
Before doing the below steps make sure you have purchased cPanel license for the new IP address. Go to website “verify.cpanel.net” to make sure the license is active for the new IP address.
1. Open a new web browser and type any of the below link to access WHM
URL to access WHM :
https://YourServerIP:2087
OR
https://YourHostname:2087
2. Enter username and password to access WHM.
To change the primary IP address of WHM you must have server root access. Enter root login details in username and password field.
3. Click on “Basic WebHost Manager Setup” under “Server configuration”
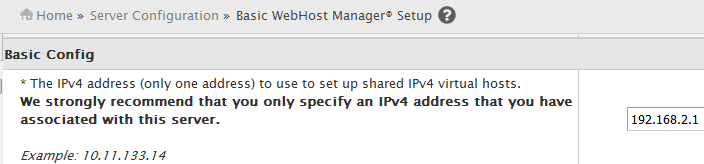
Home » Server Configuration » Basic WebHost Manager Setup
On new cPanel servers (Easyapache 4) the option is “Basic WebHost Manager Setup” and on old cpanel versions it is “Basic cPanel/WHM Setup”.
Main >> Server Configuration >> Basic cPanel/WHM Setup

4. Under Basic Config you can see “The IPv4 address to use to set up shared IPv4 virtual hosts”. Enter the new main shared IP address here.
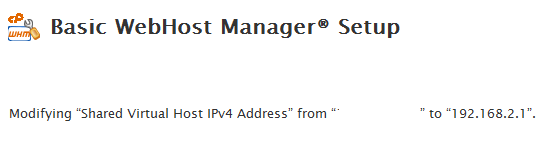
5. Click on “Save Changes” after entering new IP address
6. Run the command “/usr/local/cpanel/cpkeyclt” to update the cPanel license for the new IP.
You can also change the Main shared IP address from the server backend. (This is an alternate method to change the main shared IP address)
1. Log into server via SSH as ‘root’ user
2. Take a backup of “Basic WebHost Manager Setup” configuration file /etc/wwwacct.conf
cp -a /etc/wwwacct.conf /etc/wwwacct.conf.backup
Always take a backup before editing any configuration files on cPanel server. We can restore from backup if anything goes wrong.
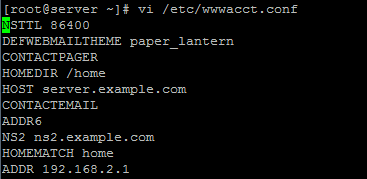
3. Open the file /etc/wwwacct.conf using vi editor and change the line ADDR to new IP address
Example :
vi /etc/wwwacct.conf
ADDR 192.168.2.1
4 Save the file and exit
Type “:wq!” in vi editor to save the file and exit.
5. Do not forget to restart cPanel Service
Command : service cpanel restart
Go to “Change Site’s IP Address” under “Account Functions” and change the IP address of all websites to new one.
Home >> Account Functions >> Change Site’s IP Address